Wednesday, June 28, 2017
Three Woofs for the Red, White & Blue
With the 4th of July just around the bend, it's time to get out the red, white and blue and, of course, Sunsational Stamps! Today I'm using the Patriotic Puppy digital stamp in another Triple Panel Standing Card. Here's a look at my finished card:
Last month I made a similar card, but used a plain circle in the center. I liked the result so much I decided to try it again with a shaped center by tracing around the image in my Silhouette design screen. This is what the cut file looks like after I sized it.
To create the mats, I made a compound path of the cut file above. Doing this converts the score/dotted lines to solid lines. This enables me to use the Internal Offset at 1/8" and 1/4" to make the mats. Here's what that looks like:
I used Stampin' Up's Real Red and Whisper White card stocks and Candy Box Digital Patriotic patterned paper. The edges of all the printed mats were sponged with Brilliant Blue (retired SU) to cover those ugly white edges.
I print and cut the dog twice; on the second I fussy cut just the head and flag as I wanted to attach it with an action wobble spring. I colored him with Copic markers and accented with Wink of Stella on the stars and Nuvo Drops in black for the nose and eyes; highlight with a white gel pen. Here's a closer look:
I made a simple sentiment, playing off the Patriotic pup image. The back of the card looked rather plain, so I added a single mat of another patterned paper from the same kit.
I know many dog-loving friends who would appreciate receiving this card for the 4th; but he's cute and he makes me smile so I'm not sure I can part with it!
And, if you get the chance, come visit me at Katydid Cards, too!
Monday, June 26, 2017
Where Liberty Dwells
Hello there, crafty friends! It’s Sharon, One Crafty Mrs, from A Piece Of (my) Heart's blog and I’m here today to share another card using this cute Sunsational Stamps digi named Patriotic Patricia . You can find her in the store, here.
Once again, I found some great digital papers to use and printed them out on my printer along with the little cutie, Patriotic Patricia, and some stars. I then used my Silhouette Cameo to cut out the banners and the digi stamp. I colored the digi with my Copics and then added my banners, the stars, and the sentiment to finish off the card.
I hope you love my card as much as I do!
That’s it for me today. Stop by the Sunsational Stamps Store and check out all the great stamps Lisa has available. And don’t forget to visit the Facebook Fan page and the Sunsational Stamps blog for some fabulous inspiration from the other amazing Design Team members.
See you again in a couple of weeks when I will be back to share some more great stamps by Lisa! In the meantime, take a minute to come and visit me on my blog - A Piece Of (My) Heart.
Tuesday, June 20, 2017
Seals and Sharks, oh my
Aren't they cute? I love the seals and that shark is pretty amazing! Just don't get too close!!!
I colored them lightly with Copic Markers, then added them to a background of blue and yellow with a Disney theme.
Tuesday, June 13, 2017
Glad We Worked the Bugs Out
In a perfect world, we'd all get along; no arguments or ill will. But this is real life and conflicts can and do happen. It's happened to you, right?
Well, my card made with Sunsational Stamp's Life is a Picnic digi stamp set is for those real life occasions when you just want to say you're happy to have "worked the bugs out". And here's the card:
This type of card is called a Tri-fold Shadowbox. I made it with a Lori Whitlock cut file I purchased in the Silhouette store. I changed things up a bit to accommodate the images. And speaking of the images...isn't that the cutest bug you ever saw?
The tri-fold back and center front piece were cut from a pale blue I had in my stash. I embossed the center panel with the Cloudy Day embossing folder...one of my favorites.
Next I filled my l'il bug with digital patterned paper. The paper has a bit of tan in it, so I color- matched the side panels and the center, middle shadowbox panel to that. Here's a closer look:
I cut the eyes and nose separately and popped them with dimensionals. Then I coated his nose with black Nuvo Drops and highlighted his eyes with White Gel Pen. The sun was covered with clear Wink of Stella.
I love the greeting included in the set and wanted to use it, but I wanted it filled with pattern. To accomplish this, I traced it and filled it with the same patterned paper right in my Silhouette.
And here's one last look from above so you can see the fold better. For mailing, the sides fold in and to fit in a padded envelope or a "chunky" card envelope also sold in the Silhouette store.
See you soon with another card. In the meantime, come visit me at Katydid Cards if you get the chance. And, if you do, please say, "hello"!
Before I leave you, I want to remind you about Sunsational Stamp's month challenge. This month the theme is Summer Fun. How about getting creative and join us over on the Sunsational Stamps Facebook Challenge Page.
And here are the rules:
- You can choose to make any paper crafts/ altered art creation you like as long as it fits the challenge theme.
- You can enter a maximum of 3 times as long as it fits in with the theme and is a new creation.
- Using a Sunsational Stamps image will gain you extra entries into the prize drawing. Please name your images In your post.
- All entries must be new, please do not link creations that have been posted prior to the day the of the current challenge.
- You must mention and make a link to our challenge on your blog/website to be eligible to win the prize
- It is OK to link other online forums.
- You are allowed to combine challenges.
- If you don't have a blog you can link your photo from your Facebook account.
- All entries to be linked before 8am EST, 1pm UK time, 2pm CET on Wednesday Jun 30th.
- The most important thing is that you have fun making your creations.
- There will be prizes and the winners will be chosen at random from all the entries.
- We are looking forward to seeing all your entries.
Monday, June 12, 2017
Summer Picnic Fun
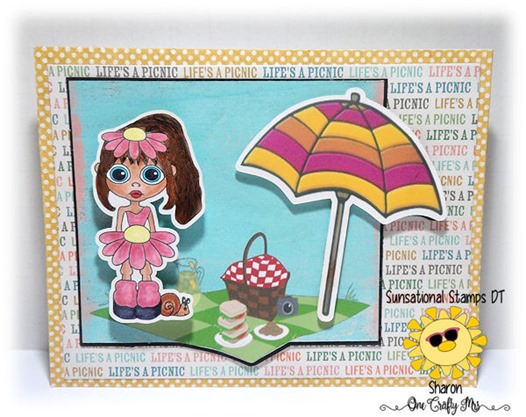
Hello there, crafty friends! It’s Sharon, One Crafty Mrs, from A Piece Of (my) Heart's blog and I’m here today to share another card using this cute Sunsational Stamps digi named Daisy. You can find her in the store, here.
This card was made using digital papers from Pixel Scrapper. I’ve really come to like using them as I can pick and choose what I want and there is no waste of pieces I will never use like sometimes happens with paper packs. It doesn’t seem to take up a lot of ink like I thought it might either. I think, in the long run, it’s probably cheaper.
I cut an 8.5x11-inch 110lb piece of cardstock at 5.5-inches on the long side. This makes a top-folding A2 card. I chose the yellow with white polka dots digital paper and cut that to 4.25x5.5-inches and adhered that to my card front. It completely covered the front of the card. Then I cut the “Life’s A Picnic” cardstock to 3.75x5-inches and adhered it on top of the previous piece. I used my Silhouette Cameo to cut out the free clipart picnic scene and added a black mat behind it. I also cut a free clipart umbrella to add to the scene and I popped it up with some dimensionals.
Daisy was cut with my Cameo and I colored her with Copics see color chart). Then I popped her up onto the beach blanket with dimensionals.
I hope you love my card as much as I do!
That’s it for me today. Stop by the Sunsational Stamps Store and check out all the great stamps Lisa has available. And don’t forget to visit the Facebook Fan page and the Sunsational Stamps blog for some fabulous inspiration from the other amazing Design Team members.
See you again in a couple of weeks when I will be back to share some more great stamps by Lisa! In the meantime, take a minute to come and visit me on my blog - A Piece Of (My) Heart.
Tuesday, May 30, 2017
A Ball to Be Around
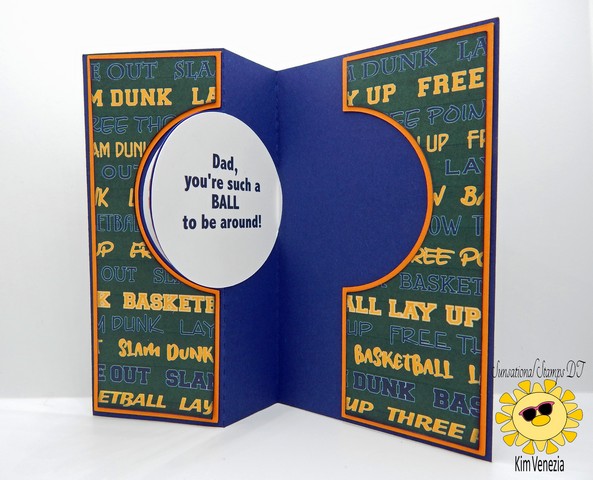
I thought a circle flip card would be a perfect backdrop for the basketball...or the baseball or bowling ball, for that matter. I'll chat a bit more about the basketball in my next paragraph, but I want to tell you about the rest of the card first. The base is made using a Christmas Wreath Flip Card cut file from the Silhouette Store (minus the wreath, of course) using Night of Navy card stock.
The file comes with one set of mats, but I wanted to double mat it. To do this, I simply created a 1/8" offset to create a slightly larger mats from scrap card stock for under the patterned paper. Speaking of the patterned paper, it's Basketball Digital Paper by ScrapbookGems.
Here's a close-up of the basket ball. To give it the appearance of spinning, I copied one of the vertical lines, flipped it and ran it horizontally across the top. I used the Tiny Bubbles embossing folder to give it a basketball-like surface.
Flip cards are such a great design. I wonder who figured out this clever fold as I wouldn't even know where to begin.
You just flip to read the sentiment. The idea for the sentiment came from the Sunsational set, I just changed the font to match the patterned paper and I color matched it to the card base.
That wraps up my post for today. If you want to take a better look at Sunsational's whimsical images, just click here. And for some inspiration and interaction, you can check out the blog and the Facebook page. And if you get the chance, come and visit me at Katydid Cards.
Before I leave you, I want to remind you about our monthly challenge ( the theme is Swim, Beach, Ocean) you still have time to enter. The challenge post can be found here.
Monday, May 29, 2017
Octopi’d Heart
Hello there, crafty friends! It’s Sharon, One Crafty Mrs, from A Piece Of (my) Heart's blog and I’m here today to share another card using this cute Sunsational Stamps digi, from the Ocean Critters stamp set.
I really love this card. I think it is going to be an all-time favorite of mine. This card was made using digital paper found on the Pixel Scrapper site. If you have never visited Pixel Scrapper you should! Signing up is free and you will get 5 FREE downloads per day. It’s a great way to build your digital paper collection!
I printed this cute little Octopus from the set and colored him with Copics. The hearts border was made with my Silhouette Cameo. I chose 2 heart shapes and colored one with a background pattern and one with a solid color. I lined them up across a 5-inch rectangle that I had drawn and then used my spacing tool to make sure they were spaced evenly across the rectangle. I printed this onto some white cardstock and adhered it to a black piece of cardstock. The sentiment was typed into my Silhouette Cameo software and printed onto a piece of white cardstock which I also matted with some black cardstock. With the leftover black cardstock I cut out a circle and a flag. I layered another circle cut from some digital background paper on top of the black circle. Once everything was cut, I adhered all the pieces onto a piece of 110 lb. white cardstock cut to 5.5-inches wide X 4.25-inches high.
I hope you love my card as much as I do!
Before I leave, I want to remind you about our monthly challenge (the theme this month is Swim, Beach, Ocean). You still have time to enter so head on over to the challenge post and link up a card.
That’s it for me today. Stop by the Sunsational Stamps Store and check out all the great stamps Lisa has available. And don’t forget to visit the Facebook Fan page and the Sunsational Stamps blog for some fabulous inspiration from the other amazing Design Team members.
See you again in a couple of weeks when I will be back to share some more great stamps by Lisa! In the meantime, take a minute to come and visit me on my blog - A Piece Of (My) Heart.
Tuesday, May 23, 2017
Happy Father's Day
Aren't the cute? What golfer wouldn't love this card? And it's so easy to customize just for dad. What color are his clubs? What is the club flag? Make it special just for dad.
Thanks for stopping by today.
Steph
Monday, May 15, 2017
No Disguising Dad
Hi there crafty friends, Sharon aka One Crafty Mrs. here to share my Monday make with you. I had a little help and used Lori Whitlock’s Circle Flip Swing card file for the Silhouette Cameo to make today’s card. I used the faces from the King Of The Grill set by Lisa @ Sunsational Stamps.
It may look simple but this card gave me a run for my money trying to figure out how to fold it, lol. Once I figured that out, I printed the faces and cut them each into a small circle to fit. I cut 3 more larger circles out to layer behind the faces. I used my PrismaColor Markers and a couple of Copics to color the faces. I cut 3 more small circles out of white cardstock and 3 more larger circles to layer behind them. Then I laid all of those pieces aside for the time being.
I used the template from the card file to cut two pieces of cardstock for the front and inside panel of my card. I used a PrismaColor Marker to run along the edge of the cardstock to give it some definition. Then I adhered it to the card front with some Tombo Multi Mono Liquid Glue. I cut another piece of cardstock and adhered it to the inside.
The final step was to attached the faces to the front and the sentiments to the inside. I added a piece of washi tape and called it done!
That’s it for me today. Stop by the Sunsational Stamps Store and check out all the great stamps Lisa has available. And don’t forget to visit the Facebook Fan page and the Sunsational Stamps blog for some fabulous inspiration from the other amazing Design Team members..
Before I leave, I want to remind you about our monthly challenge (the theme this month is Swim, Beach, Ocean). You still have time to enter so head on over to the challenge post and link up a card.
I hope you enjoyed my card today. See you again in a couple of weeks when I will be back to share some more great stamps! In the meantime, take a minute to come and visit me on my blog - A Piece Of (My) Heart.
Tuesday, May 2, 2017
King of the Grill
With Father's Day coming next month, Sunsational Stamps is featuring sets which would be perfect to use for cards or layouts honoring the dads in your life.
Today I'm using the King of the Grill digital stamp set. Here's a look at the full set:
I had two cards in mind for this set. It was really difficult to only make just one as I loved both ideas. Here's the winner . The inspiration for this card came from my blogging friend, Kelly, who is a consummate card maker.
I designed this card in my Silhouette. The base is 4 1/4" x 7", scored at 3 1/2" cut from Riding Hood Red card stock. For the greeting, I created a text to path on a 3" circle. The mat was made with an 1/8" offset. I attached this piece to the base to make a 4 1/4" x 5 1/2" or A2 sized card.
I imported the grill and utensils into my design screen, sized and traced them. Then I print and cut them together with the stripe and plaid patterned paper. The images were colored with Copic markers; C3, C5, C7, C9, 100, E33, YR18 E57 & E59. Here's a closer look at the coloring:
For inside the card, I got the adorable idea for the greeting from the set. I changed the font to match the greeting on the front and with that, the card was finished.
A little story about the sentiment. I looked at it once when I typed it, again when I printed it, a third time when I attached it to the inside of the card and a final time when I took the pictures. After all that, I didn't notice I typed Happy Day's Day! I find it amazing that I could overlook such an obvious error all those times. It was the sharp eyes of our DT Coordinator, LeeAnn, that saved the day!
If you want to take a better look at Sunsational's whimsical images, just click here. And for some inspiration and interaction, you can check out what the other designers have made for you here on the the blog and the Facebook page. And, if you're in my neck of the woods, come visit me at Katydid Cards.
Friday, April 7, 2017
Hunny Bunny Onesie
I changed the format of the Hunny Bunny stamp in my Silhouette software to make it a cutting files. I then broke the file down into smaller parts so I could cut each section of the bunny separately. I'm soo glad I have an enormous supply of HTV and Onesies, I didn't have to leave the house to purchase any additional supplies!
Any of Sunsational Stamps digi files can be made into cut files in many electronic cutting machines software.
Have a great day! Hope you enjoyed my version of the Hunny Bunny digi file!
Monday, April 3, 2017
It’s A Ducky Life
Hi there crafty friends,
I’m so excited to be chosen as part of Sunsational Stamps new Design Team and today I’m sharing my first project with you using Lisa’s darling digital stamp “Spring Is Ducky” which can be found in her newly designed store. Just click on this link to go there.
When I saw this cute little ducky upside down in the water I thought it would make a great encouragement card and just knew that I had to use him. Below is a picture of the outside and inside of the card.
I always have trouble trying to figure out what papers to use for my card so with this card I decided to take a look online to see if I could find anything and I came across this cute blog, LianaScrap.com and found some really nice papers. The papers I decided to use are from the Day Dream Set. She has lots of other cute sets so click on the link to go visit her and check them out for yourself.
I printed the image onto some white Strathmore Bristol Smooth paper and used my Copic markers to color it. I have a mish-mash of markers but today I decided to use my Copics. I punched it out with my Fiskars circular punch and set it aside. I used my Silhouette Cameo to cut out my digital paper and the scalloped image that mats the punched image. I also typed my sentiments (outside and inside), printed them, and cut them out. Then I layered them onto some black cardstock. I found a graphic of a pond online and printed it. Then I cut around it and made a small slit in the water. I printed, colored and cut out another ducky from the set. I slid the ducky’s feet through the slit in the water so that it looked like it was swimming on the water. I adhered the feet to the back with some tape to hold it in place. Once I had all my pieces completed and set aside, it was time to start putting everything together.
I took an 8.5x11-inch piece of white cardstock and cut it down the middle of the 8.5-inch side leaving me with two 4.25x11-inch pieces of cardstock. I scored the long edge of one of them along the 5.5-inch mark and folded it in half. This left me with a card base that was 4.25x5.5-inches. I adhered my 2 pieces of designer paper onto the card base so that they each covered half of the base. Then I layered a couple of rectangular pieces across the middle to hide the seam. I wrapped a piece of black ribbon around the rectangular pieces before adhering them to the cardstock. I mounted my punched image on top of the scalloped circle and adhered that to the front of the card along with the sentiment. The front of the card was complete and now it was time to move onto the inside.
I cut a couple more rectangles out of the designer cardstock and adhered them across the bottom portion of the card. I adhered the pond on top and added my sentiment and the card was finished!
Thanks for taking the time to drop by. I hope you enjoyed my project and I’ll see you soon with another Design Team share. The supplies I used are listed below: