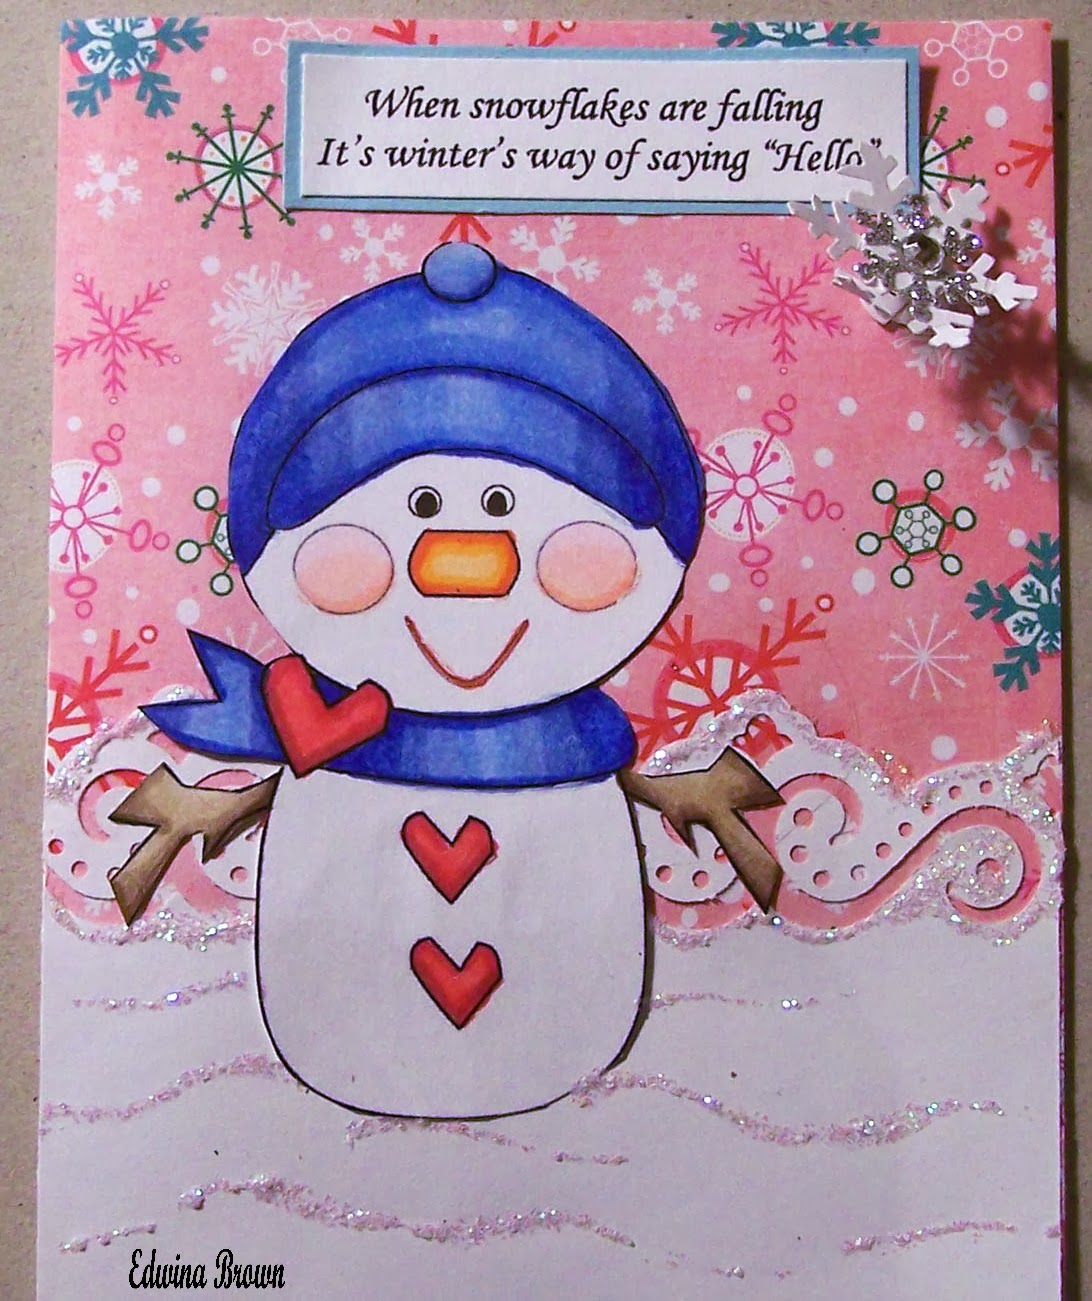
Friday, February 28, 2014

I Love You

Hello Everyone, DT Sandy for today's Sunsational Stamps project...

Made an easy Tri-fol shutter card to feature this cute digi teddy bear angel stamp...


Hope you like this card project. You can check out Sunsational Stamps store for many more wonderful stamps and.for more inspiration, check out my blog A Working Mom's Joy

Thank you for stopping by, and happy stamping to all.
Sandy
Sunsational Stamps 
DT Member

Thursday, February 27, 2014

Foxxy by Marji

Don't hate me if you have that song in your head, I couldn't resist when I was going through my images and saw sweet little fox here.
 I used my sketch pens to write the word in my Cameo then created the speech bubble with an oval then drew the point with the pencil tool there in the program.
I used Lisa's JPG image already colored, I think he's perfect the way he is.  The papers I used are from Stampin Up.
Be sure to click the link at the top of this post to go shop and get your own foxxy 

Monday, February 24, 2014

Sam the Snowman cards


Hello, Edwina from the DT here. Today I am using a stamp by Sunsational Stamps called "Sam the Snowman." You can find it here http://www.sunsationalstamps.com/item_28/Sam-the-Snowman.htm

First card:
Copics used are C1, C3, C5, C7, C10- hat, R29, R56, R59- hearts, YR01, YR04, YR09- nose, RV000, RV00, R20- cheeks, BG10, BG11, BG13, BG15- scarf, E43, E44, E47- arms.

Gelly Roll pens used are black- eyes, red stardust- mouth.

The snowman is pop dotted up.

The snowflakes are by Jolees Boutique.

The ribbon is by American Crafts.

The papers are by Recollections- prints, Colormates- light teal, Georgia Pacific- white. 

The card is 4 1/4" x 5 1/2". 

Second card:
Copics used are B91, B93, B95, B97- hat and scarf, R35, R37, R56- hearts, YR01, YR04, YR09- nose, R20, RV000, RV00- cheeks, E43, E44, E47- arms.

Gelly Roll pens used are black- eyes, red stardust- mouth.

The snowflake border is punched out using a border punch by Martha Steward.

The papers are by Recollections- prints, red, Georgia Pacific- white, Colormates- light teal.

The card is 4 1/4" x 5 1/2".


Saturday, February 22, 2014

Need a Hug?


Do you need a hug?  I believe we all do at some time and right now, I sure could use a hug or two -- from my granddaughters!!

Supplies used:
  • Digital stamp "Need a Hug?" by Sunsational Stamps
  • Swiss dot embossing folder used to emboss the larger mat
  • paper designs from my Silhouette Studio "My Library"
  • Brads, buttons and baker twine
Measurements for layered pieces

    Main mat: 13cm x 13cm (5x5)in
                       8cm x 5 cm (3x2)in
                       12cm x 4 cm (4 3/4 x 1 1/2) (used 11cm x 6 cm)in
                       3cm x 2cm (1 1/4 x 3/4)in
                       9cm in diameter  (3 1/2 in in diameter)

TIP:  when converting from Metric (centimeters) to Standard just change your measurements in your Studio software under preferences from Auto to CM and than when checking the size of your pieces or changing the sizes, you can just enter the cm numbers and will come up to that size. (unless you know how to do the math!!)

I placed the main mat thru the Sizzix Big Shot and embossed it 2 times since the mat was a bit wider than the embossing folder.  And the little 'gap' between the dots covered by the placement of the mats.

Basically, this card makes a 5x5 (size of base card is approx 5.25 x 10.25).

Thank you for stopping by to visit with us at Sunsational Stamps, and for more inspiration, please stop by my blog here .  Have a blessed day, and hugs to all...xoxo
                       

Friday, February 21, 2014

You are Fairy Sweet

Hello Everyone, DT Sandy for today's Sunsational Stamps project...

Made an easy Joy- fold card to feature this cute digi stamp...
http://www.sunsationalstamps.com/item_8/You-are-Fairy-Sweet-Bear.htm


I used color pencils and odorless mineral spirits (OMS) for my coloring.A very easy and simple card to make.


Hope you like this card project. You can check out Sunsational Stamps store for many more wonderful stamps and.for more inspiration, check out my blog A Working Mom's Joy

Thank you for stopping by, and happy stamping to all.
Sandy
Sunsational Stamps 
DT Member

Thursday, February 20, 2014

Sweet Dragon by Marji


Is this not the sweetest face you've seen?  I just think he's the cutest.
The link above will take you to the shop
 I used Lisa's colors in her JPG file and let my cameo do it's print and cut thing using the offset feature for the outline cut.
The papers are from Stampin Up and the "hello and the stars" are rub ons from SU as well.
 This cute fabric covered button is from Pinque Peacock.

Monday, February 17, 2014

Stew the Snowman cards


Hello, Edwina here from the DT. Hello, Today I am using a Stamp by Sunsational Stamps called "Stew the Snowman."  You can find it here http://www.sunsationalstamps.com/item_23/Stew-the-Snowman.htm

First card:
Copics used are B000, B01, B02, B04, B05- hat and scarf, R29, R56, R59- hearts, RV000, RV00, R20 - cheeks, YR01, YR04, YR09- nose, E43, E44, E47- arms.

 Gelly Roll pens used are red stardust- mouth,  black- eyes.

The snowflake is by Jolees Boutique. 

The glitter ribbon is by American Crafts.

The papers are by Recollections- prints, Colormates- pink and light teal, Georgia Pacific- white.

The card is 4 1/4" x 5 1/2".

Second card:
Copics used are B21, B23, B24, B26, B29- hat and scarf, YR01, YR04, YR09- nose, R35, R37, R56- hearts, RV000, RV00, R20- cheeks, E41, E43, E44- arms.

Gelly Roll pens used are black- eyes, Red Stardust- mouth.

The snowflake is on a spring so that it wobbles or twirls. The white snowflake is punched out using a Martha Steward punch. The silver snowflake is by Jolees Boutique.

The border is punched using a border punch by Martha Steward. I then added glitter glue to it.

The card is 4 1/4" x 5 1/2".

Have a wonderful day!


Saturday, February 15, 2014

Lisa

Lisa

Good morning, Carolyn here to share with you what I created using the digi stamp "Lisa" from Sunsational Stamps.

The main layer of the front mat I cut out a fancy label mat, and using the same cut piece, I created a lattice and than applied to the main mat and framed it with brown card stock.   

I traced the image, Lisa in my Silhouette Studio and colored with Stampin! Up markers, but the hat and brim is paper pieced from another image of Lisa that I hand-cut.  Placed Lisa on the edge of the lattice window using foam tape.  Flowers from from a swap that I participated in on Facebook at one time.

Please visit me at Granny Ma's Creative Blog to see what I've been up to lately.

Thank you for stopping by, and hugs to all...xoxo


Friday, February 14, 2014

Sweethearts

Hello Everyone, DT Sandy for today's Sunsational Stamps project...

Check out this cute little couple! They were my Valentine's inspiration so HAPPY VALENTINE'S DAY to you along with a great big hug, lol!

Hello Everyone, DT Sandy for today's Sunsational Stamps project...

I just fell in love with these stamps when I spied them in the store. They are just darling and a perfect image to color.


I used color pencils and odorless mineral spirits (OMS) for my coloring.The base is a center step card, you can find the instructions at the Scrapbook Blessings Club here. The hearts where stamped and punched out using the the ek Success Stamp and Punch.

Hope you like this card project. You can check out Sunsational Stamps store for many more wonderful stamps and.for more inspiration, check out my blog A Working Mom's Joy

Thank you for stopping by, and happy stamping to all.
Sandy
Sunsational Stamps 
DT Member

February 14 "Love Is In The Air" Blog Hop


Welcome to February's Sunsational Stamps Design Team Blog Hop on February 14 from 9 am to 11 pm CST. Thank you for joining joining us and Happy Valentines Day . The theme of this hop is Love. So sit back with a nice steaming hot cup of cocoa and find your way to each of these blogs for some incredible projects.

I do have a few rules for this hop to support each crafter and the time they have put into their work. In order to be eligible for the blog candy, you MUST visit each blog, leave a comment, become a follower of each blog, and our dt blog at http://  sunsationalstamps.blog spot.com/. The blog candy will be one digital stamp of your choice fromhttp://sunsationalstamps.com . You can send your choice of digital stamp to ljopeters62@yahoo.com with a subject: dt blog hop and I will send it out to you asap.

We have added a little Twist to this months Hop. We are going to have a Link UP Party /Contest. Everyone is invited to participate It will run through the end of the month February 28th at midnight. On march first we will pick a winner and that person will be our guest designer for March, along with receiving the March release stamp for free. In order to participate you must use the free digital stamp that is provided here.  


When your project is complete just add it via the link widget below  so we can view your project. Hope you will all join in the fun .

If you happened to have stumbled upon this blog by chance  or accident, please make sure to head to the first blog listed so you don't miss any of the Love we have to share with you. This hop runs all day long, so you will have plenty of time to make it all the way through the hop. Check out each blog and see what each blog has to offer for their project! After all it's Valentines Day and who doesn't like a little Love.

Love DT Blog Line Up:


This is the last stop Hope you have enjoyed the hop and all the wonderful creations our team has prepared for you Today. Don't forget to join the fun and let us see what you have created with our freebie!!! Use the link up at the bottom of the page,
Thanks for stopping by see you all next month!!

Janet and Lisa.


Thursday, February 13, 2014

Rag doll scrapbook page by Marji


I am sharing a sweet scrap book layout today.  I take so many pictures of my daughter it's crazy and now she will pose and say, "mom, take a picture of us" and have her doll or a toy.  I can't say no, can I?
 This page is inspired by one of those moments.  I used the rag doll image and changed her outfits by using the print and cut feature and the colors and patterns in my Cameo.
 I also used my Zink Happy photo printer to make the title.  It's such a fun printer.
 Here's a close up of the dolls, I had a lot of fun making their outfits different.
 Emily saw this page and she wanted to know who those girls were"  She was not satisfied when I told her I didn't have anyone in mind, they were just baby dolls.  So please let me introduce you to "Jessica", "Bella", and "Elsa".  :)


Easter scrapbook page by Marji

What's In Your Basket?
This stamp makes me giggle, they are so cute, hanging out in their bunny slippers munching on their M&M's

I wanted to make a simple lay out for Easter so I kept them as my focal point just adding one simple flower, a Layered Garden Beauty from Pinque Peacock.

I colored them with my colored pencils.  I gave them colored tummies and muzzles to add to the fun Easter feel.  I added crystal effects to their eyes and noses and on the slipper faces as well as the M&M's. 
I hope you like it!

Monday, February 10, 2014

Bee Mine card


Hello, Edwina here today on the DT. I am using a digi by Sunsational Stamps called "Bee Mine". You can find it here http://www.sunsationalstamps.com/ .

Copics used are Y21, Y23, Y26, Y28, C3, C5, C7, C10- bees, RV00, Rv02, RV04, RV06, RV09- heart.

The words Bee Mine are colored with purple metallic Gelly Roll pen.

Glitter glue was used on the bees wings.

The die cut is called Heart Circles by Spellbinders.

The ribbon is by Celebrate It Valentine collection.

The background paper is made placing heart washi tape by Sandi Lion and 3/16" strips of card stock on white card stock. 

The papers are by Recollections- pink, Colormates- red, Georgia Pacific- white, red for die cut- Recollections.

The card is 4 1/4" x 5 1/2".

Thanks for dropping by. Happy Valentine's day! 


Saturday, February 8, 2014

Saint Patrick Card

Irish Leprechaun


 Front of Card
Inside of card

Supplies used:
  • Card stock
  • Design paper created and printed from Abode Photoshop Elements Ver 12
  • Word Punch paper punch
  • eyelet punch
  • Green gemstones for embellishments
  • Adhesive and foam tape
  • Bic markers for coloring
  • Software: Silhouette Studio DE
Instructions:
  • Measurements; 4.25x11 for base
  • Inside design paper: 5.50x approx 6
  • Topper: 4.25x2.25
  • Inside where the bucket is placed on I cut out a 1x4 strip
Trimmed card stock to 4.25x11 for the base and using my word punch paper punch I created two slots for the pop-down 1x4 strip will be adhered to.  I attached to the pop-out tab and foam taped the coin bucket to the bottom, making sure it does not show at bottom.  

Front I trimmed a piece of the printed design paper for a topper (to close the holes left from the pop-out tab) and punched a edge of eyelets on the topper edge and on the edge of the front of card, and on the top and bottom edge of the inside matting.  Using my Silhouette Studio DE I printed and cut the Leprechaun, Bucket of gold, and title and placed on shadow background and placed on foam tapes to the front of card, inside top, and on the  strip of card to create a pop-out effect.  From the left-over trimmings of the design paper, I placed a small border just top of the eyelet punched area.
 
Thank you for stopping to visit with us today, and come check out my blog at Granny Ma's Creations.

Carolyn

Friday, February 7, 2014

Owl Always Need You

Hello Everyone, DT Sandy for today's Sunsational Stamps project...

I just fell in love with these stamps when I spied them in the store. They are just darling and a perfect image to color.

I used color pencils and odorless mineral spirits (OMS) for my coloring. I also ran the pink Core'dinations card stock through the embosser with my hearts folder and sanded. A very easy and simple card to make.


Hope you like this card project. You can check out Sunsational Stamps store for many more wonderful stamps and.for more inspiration, check out my blog A Working Mom's Joy

Thank you for stopping by, and happy stamping to all.
Sandy
Sunsational Stamps 
DT Member

Thursday, February 6, 2014

Sweet Squirrel easel card

Today I'm using this adorable squirrel image, isn't' she cute?  

 I went way out there on this one, if you've got someone who's really depressed, this would be a great card to make them smile.  I made it an easel card so it can be displayed and remind them to Think Happy Thoughts!
 I made a simple crochet chain with some twine, then added lots of punch art confetti.  I keep a small box for all the tiny punch pieces I have from projects.  I simply swirled my glue then laid the pieces in place then sprinkled some dazzling diamonds glitter over the wet glue.
I gave her a flower in her ear and pierced her other one with a pearl, lol, then gave her a pile of confetti to sprinkle about!

This is what the whole inside of the card looks like.
She's also got some crystal effects on her eyes and nose.

Monday, February 3, 2014

Bee Mine card


Hello,Edwina from the Dy here today. I am using "Bee Mine" by Sunsational Stamps. You can find it here http://www.sunsationalstamps.com/ .

Copics used are Y11, Y13, Y15, Y17, C3, C5, C7, C10- bees, R32, R35, R37, R29, R56- heart.

The words Bee Mine were colored with Purple Stardust Gelly Roll pen.

I used Glitter glue on the bees wings and antennas. 

The large gems on the bees wings are by Creatology. The red heart gems are by Recollections.

The die cut used is by Spellbinders called Hexagons.

The heart design is washi tape by Sandi Lion..

The print paper is digital by Pixel Scrapper. The other papers are by Recollections- red, autumn gold, Georgia Pacific- white.

The card is 4 1/4" x 5 1/2".

Have a wonderful day!


Saturday, February 1, 2014

Garden Girlies

Some parts of our country have seen lots and lots of snow and we in Scottsboro, AL received a dusting of the white stuff on the ground with very cold temperatures at night.  Hopefully this will give us the inspiration for spring and warm weather.


Supplies used:
  •  Cardstock from my stash 
  • water color paper for the image
  • Kodak markers for coloring with some Close to My Heart Ink Markers, and Copic marker for the skin tones.
  • foam tape for popping up the Bumble Bees and Garden Girl
  • Design paper from my stash
  • adhesive
  • the card base and center matting from Silhouette America Online store.
Please check us out at Sunsational Stamps

Thank you for stopping by to visit with me today, and hugs to all xoxo.